Saturday, 21 May 2011

Autodesk Maya Project Brief

I have been given the task of creating a  domino effect sequence. Base on a  theme of my choice. I should consider what the setting would be, the objects and  the goal.

To help come up with an idea I did some research into Rube Goldberg machines, this meted me basically  watching a lot of videos of contraptions and devices, both of which were  live-action and animation. These are some of the best videos I found which helped me come up with my idea.

3D Rube Goldberg machine


Although being the first reference video I am posting, this was not one of the first I found (which could have saved me a lot of time). This Rube Goldberg machine was instrumental in the concept of my idea. I think it is well done, and i like in particularly the end. My idea takes strong influence from this animation. 


Marble Course (3ds Max animation)


This animation was another great Rube Goldberg machine I found, and really liked. The texture and detail put into the background and objects is impressive. The animation flows well and runs really smoothly.


Computer Animated Rube Goldberg


This is another great Rube Goldberg animation I found which helped me build on my idea.


This is just a really cool 
domino effect sequence!!


Thursday, 19 May 2011

Modeling with NURBS

The second way or method of modeling is with Nurbs. Nurbs is a easy and simple way of modeling. However it is not used for modeling in game engines but it can be converted to polygons.  Working with Nurbs is a quick and effective way of creating pots, glasses, bottles and etc. Here is a pot i made experimenting with Nurbs.

 Using Nurbs


To create my pot I used the the line tool under the curve list. I then drew a simple outline of half the pot. It is essential that the line is attached to the center point of the grid. For the revolve  to work.


Once I had finish drawing my line I could now revolve the curve . Under surfaces there you should find the tap revolve this will revolve your curve creating  your pot/object.


The revolve however creates a hollow object . To give it some thickness you would have to  draw an  inner line. 


Wednesday, 11 May 2011

Introduction to (Autodesk Maya) Digital Media

I am now learning the basics in Autodesk Maya 2011, and I have to say I like it. Maya is a very complex and hard program to learn, with so many tools and short cuts, to learn and understand it takes months of practice at it to become a pro.

I had never used Maya before so it was challenging, however I did watch a lot of tutorials giving me some knowledge of the program. In class I practice using the software and got use to the interface and learning a number of the tools and short cuts.

So far in Maya, I have started to learn how to creating polygonal objects and model them using the tools. This is the first modeling technique I have learned in Maya and is considered to be industry stranded. With this method I was able to model of an apple. Here is it, followed by the steps taken to created it and add the texture.


Modeling an Apple


When creating the apple, the first thing  we were ask to do was gather some reference images. These images where to be the front and bottom perspective of it. I chose to model after a green apple ( I like Green apples). Once having got these images we assign them to the grid. The front image of the apple place was put in a front view and the bottom image of the apple place beneath the grid.


Once in place, I created a sphere use the polygon tool. I used a sphere as it is the easiest object to model an apple in. The second thing I did was make the object transparent allowing me to now see the image of the apple behind. This was done using the x-ray tool . 


As I could now see the image behind it. The next step was for me to used the Lattice tool  to shape the object. The Lattice tool allowed me to manipulate the vertexes of the sphere. Using this tool I form the apple as close as possible to that of the image.


Once I was happy with the shape I made the dents  to the apple at the front and bottom of the it. I made the steams for the apple using the cylinder tool. I made a small cylinder scale the top face out and bent it.


Finally I added the texture to it. I did this by assigning the texture to the object. I used blinn to give it the glow. 


Thursday, 31 March 2011

Lights, Camera, Stop-Motion!

Filming “Alienated” went; well the experience was fun and challenging. While filming we did encounter the rare problem know and then but we were able to solve them.

These where the first scenes we filmed.  

We filmed the scenes where the room was
clear and tidy state  first before we would
have to mess up the room  for our later
scenes.
What a mess... this is the room after we
mess it up.


This is an example of one of the problems
we had while filming. I filmed this scene on
the table moving the toothbrush on the wall.
Coming to the end of filming, we began
shooting the garden scenes  last. These
scene went well although some where hard
it all came out smooth and looking good. 


Alienated The Film!

Here is the final version of the film enjoy!


Set Construction In Pictures

Early stages of our set. We decided
that it would be best, to make our set
 out of wood and not of cardboard. We
made this decision as we would be
gluing a lot and card would not hold
up. it was also to make our set
look professional.
Here we drew measurement lines on
the wood so that we would know
were to make the cuts and make them
as accurate and procies as possible.


After making the cut and some sanding 
we were the doors and window were
able to fit perfectly. i and to other
members made the cuts however we
argued that, I was the smoothest. 
Having made some of the props we put
them in place, closely following the
lay out of my ideas (see above). 


Myself and two other worked on fitting
the wallpaper. the theme we where go 
was  a retro old 70s look.
With the two inside door we chose to
skimpily glue them in, As they were
part of the background set and would
not need to open or move.

The next thing I need to do was apply
skiting boards to the top and bottom
of the walls. This was intensionally only
meant for the bottom but after a test
shoot of the set it was revealed that
you could see the top, so we add
it. I fitted them in and also painted. 
Here I put in the flooring while another
member drew the floor boards in pencil 
before properly in ink. 


We also put wallpaper behind the door
and window frames. You see this for 
two shoots.
With the interior all put complete we
turned our attention to the outer-interior.


For the outer-interior we brought  a
basic brick design. Glued it the wall.


Looking Good. As some final touches
we add some mail to the garden of 
the alien. 


Applying the finishing touches, we
add rubbish to the bin, glued the
clock to the wall and added sockets 
and  light switches to the walls
(including Alien and bathroom).


Set Construction Design "Alienated"

Making the set was although fun was very long. The process required a lot of time and effort. During this process I worked hard, landing my services to help speeder the production.

During the creation of the set, I had many job roles. One of them included designing the two rooms of the characters. I chose to primarily focus on that of the protagonist; this was because he had the most belongs in his room (living room).

Reference pictures. This
gave me an image of
want it should look like 
Reference pictures. This is pretty
chose the design i came up with
of the room.


Designing the protagonist’s room was quite simple, I looked at a variety of different room designs to get inspiration and get an idea of what the room should look like. The main factors where that the room had: a desk, stool, letters, wall clock, sofa, guitar, post-it notes on the wall, and a bin, this was contrast to the alien character in which we decided would just have to chairs in the room.


This is the Protagonist  room design.

Adaption (Synopsis) "Alienated"

Adaption "Alienated"

Are newest project was to adapt a screenplay created by one of the second years. Working in a group of six, we where handed a copy of different screenplays and given the choice to choose one we would like to adapt.The screenplay we choose was screenplay 2 ,(screenplays were number not tittle) why we were so attracted to screenplay 2 and choose it over the others, was because of its simplicity and good story. Compare to the others, screenplay 2 focused on the protagonist and his problems he had to deal with life. I like screenplay 2 and was happy to choose it. (There was also no dialogue, it was just a series of events.this goes for all screenplays)

Synopsis

Are story went through two drafts, as we made some adjustments to it. The originally plot was that the protagonist was paranoid and frighten of his neighbor. After hearing a loud bang come from there he disceds to go over and see whats going on. However he is shock to see a room in total disarray and  a man in tattered clothing writing on the wall. We made the descion to change this so that the second character was alien and that the protagonist had a phobia of aliens and was paranoid that his neighbor is an alien.This idea came from a member of the group who had seen recent seen Paul.

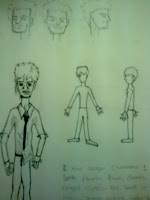
Early character designs
character 1 and character 2
on the (right)
The second character who was
later replace by an alien.

Another member of the group created these storyboards. (However it does not feature the alien  as it was not yet design)